Category Archives: Software

Managing the FTM transition

FTM TRANSITIONIt’s certainly an interesting story about Ancestry dropping their desktop genealogy software Family Tree Maker (FTM). Ancestry themselves claimed the software was “The #1 Selling Family Tree Program”. It would seem unusual that the #1 selling program would be discontinued. It’s possible FTM was some kind of loss-leader to get people to sign up to Ancestry.com, although it seems odd that they would need to lose money on the program. Other genealogy programs seem to make money. It would seem logical then that the transition is strategic, in order to get more people to use their online family tree product, which as part of their overall service, generates much more revenue for them. As a strategic decision, however, I think they made a mistake in not transitioning the features many genealogists rely on in desktop software to their online offering first, features like charts and reports, as well as better backups of data than the GEDCOM available from Ancestry’s online service.

Their initial blog post announcing the ‘retirement’ of FTM has so far generated over 8500 comments. A second follow-up post has generated another 950 comments so far. Cleary, people have concerns about how Ancestry is handling the transition.

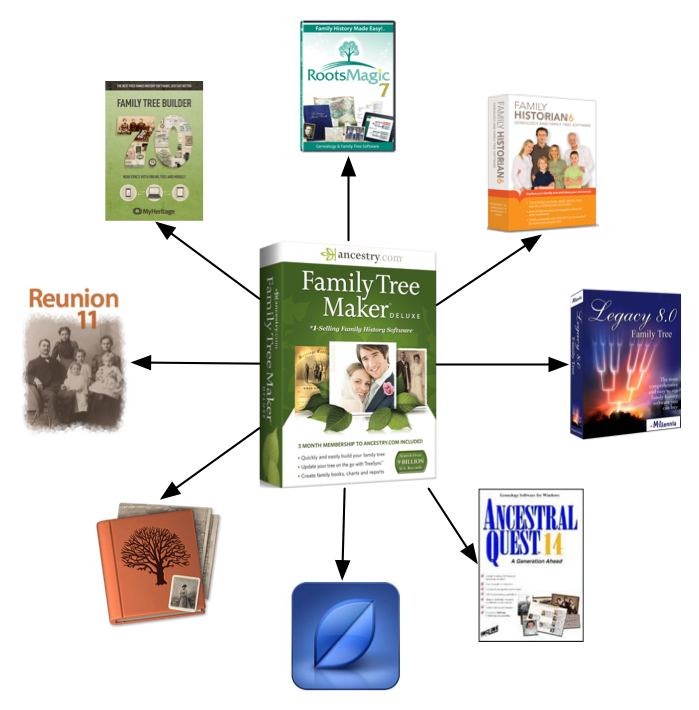
Other companies, of course, are not sitting still. Pretty much every other major desktop genealogy software company has made announcements trying to get disaffected FTM users to switch over to their software. Here are the announcements I found:

Ancestral Quest (Win & Mac*): Ancestral Quest competitive upgrade for Family Tree Maker
Family Historian (Win): Family Historian Welcomes Family Tree Maker Users
Heredis (Win & Mac): Important information about genealogy
Legacy (Win): How to import Family Tree Maker into Legacy PLUS your questions answered
MacFamilyTree (Mac): Family Tree Maker discontinued – Switch to MacFamilyTree and Switch from Family Tree Maker to MacFamilyTree and import your family tree
MyHeritage Family Tree Builder (Win & Mac*): FTM Users: Join MyHeritage and get Family Tree Builder with an Unlimited Size Family Site for Free
Reunion (Mac): Moving your tree from Family Tree Maker to Reunion
RootsMagic (Win & Mac*): Family Tree Maker Upgrade

* These Mac versions run in Emulation using CrossOver or similar technology. This means they are essentially the Windows versions running on the Mac, with no special adaptation made to the user interface to fit Macintosh interface guidelines.

My impression was that RootsMagic was the first to come out and announce a transition plan, even launching the site ftmupgrade.com with instructional videos within a day of the announcements. Most companies have offered financial incentives to switch now as well. Ancestral Quest is offering $10 off their normal price, Family Historian is offering 20% off, Heredis is offering 50% off, MacFamilyTree is offering 50% off, MyHeritage is offering an unlimited size family tree (normally their free tree is limited to 250 people), and RootsMagic is offering their full version for $20 (instead of $44.90). Most of these deals are limited in time, so if you’re interested in taking advantage, definitely check out the programs soon.

It seems everyone suggests exporting a GEDCOM from FTM and then importing that GEDCOM. Only FTM 2012 and later support exporting media with the GEDCOM file.

One problem that seems to be common among those transitioning is how FTM handles source citations. FTM allows media to be linked to source citations, which are in turn linked to a master source. Many genealogy programs use a single master source, but not individual source citations for media. This is confusing some imports, and is not being ignored by the other software companies. I’ve noticed Reunion mentioning that they are working on a fix for this in their forum. I’m sure others are also working on this problem.

Do you use FTM? What are your plans for transitioning? Are you planning to switch to Ancestry’s online site, or moving to a different desktop program? Have you already switched? What has been your experience so far?

Ancestry just killed off Family Tree Maker

It appears that Ancestry.com just killed off their desktop genealogy software Family Tree Maker. They will continue to sell it until December 31, 2015, and will cease supporting it on January 1, 2017. That means people who use the software can continue using it for another year, and Ancestry will continue to support features like TreeSync (which allows users to sync their FTM tree with their Ancestry.com tree).
Family Tree Maker Box
Personally, I was never a huge fan of the software. Of course they never fully supported the Mac platform, but I tried all their Mac versions, and even beta tested the second version for them. I had two major complaints with the software. The first was that it was buggy. That might have just been the Mac version, I’m not sure. The second, was that the user interface was very counter-intuitive to me. there were other problems, like its handling of images, and other minor complaints, but it seems pointless to go over them now. The main reasons I continued to try using it was the potential for syncing with Ancestry.com, and for sharing files with other relatives who used it, but it was never my primary genealogy software.

Unless I’m mistaken, that leaves MyHeritage’s Family Tree Builder as the only desktop genealogy software left that is paired to an online family tree site.

Interestingly both Ancestry and MyHeritage have added Mac versions of their desktop software in recent years. The only other major genealogy software to make add Mac support recently has been RootsMagic, which used the same Windows-emulation technology as MyHeritage to port their Windows software to the Mac.

I don’t know the market share of all the different genealogy programs out there, but I imagine there will be a mad scramble to try to grab abandoned FTM users. I don’t know what market share FTM had overall, but my impression is that is was significant. I don’t know if any other genealogy program is able to successfully import data from FTM files without losing any data. I imagine developers of other programs are now looking at how to improve their importing.

One technology for importing FTM files was GenBridge, which was a library developed by Wholly Genes Software, the creators of The Master Genealogist (TMG) software. GenBridge was licensed to several other genealogy software companies to allow importing of different formats, although Wholly Genes Software discontinued TMG last year, and presumably GenBridge was discontinued with it. It would be interesting if GenBridge was discontinued right before FTM users needed the capability.

I remember a company a few years ago that was developing software to sync between different genealogy programs as well as online services. The company was called Real Time Communications and the product was called AncestorSync. That product never really made it out of beta as far as I can tell (I’m pretty sure the company closed around 2012 or 2013 at the latest), but I wonder what happened to their sync technology. Someone might want to brush off some old code if it’s still able to convert FTM files.

I’m not sure Ancestry has handled the ‘retirement‘ of their desktop software so gracefully. A lot of people are undoubtedly upset about FTM being discontinued, and whether or not they will have support for a year, they still have a lot of work ahead of them to get their family trees transitioned to new software. I wonder if Ancestry’s hope is that users will just sync their trees to Ancestry’s online trees, and forget about desktop software altogether. That’s certainly the easiest option for a lot of users, but they lose a lot of the advanced features that come with desktop software (like charts, reports, media handling, etc.). I hope Ancestry will show a little more compassion for their users and provide more options in the coming year for getting their data out of FTM and into other full-featured programs. Time will tell.

What DPI should I scan my photos, and in what format do I save them?

My lecture Preserving Photographs, Scanning, and Digital Backups at this weeks’ IAJGS International Conference on Jewish Genealogy was well attended with somewhere around 150-200 people. While I can’t post the video of the presentation on my blog, I do want to share some of the information from the lecture here.

The two most common questions I get about scanning photographs are:

1) What DPI do I need to scan my photo?
2) What file format should I save the file in?

DPI stands for dots-per-inch, and refers to how many pixels are present in each inch of the photograph. For example, if you had an 8×10 inch photograph, and you scanned it at 100dpi, you would have a photo that was 800×1000 pixels, or 800,000 pixels altogether. That’s less than a million pixels, or another to say it is it is less than a megapixel. Doubling the DPI to 200dpi, gives you 1600×2000 pixels, or 3,200,000 pixels, or 3.2 megapixels. Note that doubling the DPI effectively quadruples the number of pixels, since the dpi increases in both vertical and horizontal directions.

Here’s another way to look at, in a slide from my presentation:

DPIAnotherWay
Basically, if you look at scanning photographs (or negatives/slides) you can see that scanning it at 300dpi for different sizes will give you much different size images. I have a rule-of-thumb that I use to determine the correct DPI to scan at, and basically it has to do with figuring out the largest size you want to be able to print (printing is usually done at 300dpi) and then adjust your scanning dpi to insure you’ll have enough pixels to print. Here’s the summary:

rule-of-thumb
For people reading this on a small screen where the image is hard to read, the basic rule is:

Minimum resolution (DPI) should be the number of inches of the largest side you want to print, divided by the largest side in inches of what you’re scanning, multiplied by 300.

So if you are scanning a 4×5 print, and want to be able to print at 8×10, you need twice the DPI you’ll print at, so 600dpi. Of course, it doesn’t hurt to scan more than you need, although there are diminishing returns. Not all photographs are high enough quality to give you a better picture when scanned at very high resolution.

A Kodachrome slide supposedly has enough resolution to output about 20 megapixels. That means you can basically max out a 4000dpi slide scanner and get a good result. That said, a small old print with lots of grain probably wouldn’t benefit by going beyond my rule of thumb, and some likely could be safely scanned at a lower resolution.

Storage is cheap though, so I say scan as high a resolution as you want, and use my rule of thumb as the minimum guideline.

So once you’ve figured out what resolution to scan in, what format should you save it in?

The short answer is TIFF. TIFF was actually designed early on for the purpose of scanning photographs. TIFF also, for the most part, does not lose any data in the file format, unlike formats like JPEG which always compress data in a lossy fashion (I say for the most part because it’s technically possible to use JPEG compression in a TIFF file, but it’s rare, and I doubt any scanner software you would use is going to do that). You can scan to TIFF format using LZW compression that is lossless (i.e. does not degrade the photo quality). TIFF is also good because it is so widely supported, and is used by archives and libraries for their own scanning, and is unlikely to become unsupported by future software.

PNG is also a good format for scanning. It’s a more modern format, and offers built-in lossless compression. It’s not as widely supported, but if space is at a premium, it might save you a bit over TIFF.

JPEG is not a good format for scanning, because it a lossy compression format, and you will always lose some data when saving to a JPEG, even if you save it at 100% quality. I sometimes scan to both TIFF and JPEG, as JPEG can be easier to share sometimes, but I am sure to have the TIFF file as well.

PDF is not a good format to scan photographs with, as you have no control over how images are compressed, and editing them is much more difficult than TIFF or PNG. In general, PDF files will actually use JPEG compression anyways, without being able to even set the quality. If you’re scanning a multi-page printed document, you can use PDF as a convenient way of sharing it, but if there are photos and other important content in the document, I would suggest scanning it as a TIFF as well. It’s not well known, but TIFF also supports multi-page documents, just like PDF.

If you have additional questions about scanning photographs, please post them in the comments below.

Using Nikud (Vowels) in Hebrew on a Mac

I’ve written a couple of articles in the past about using Hebrew on your computer, specifically Finding Hebrew Fonts and the more niche Trick to use Hebrew and Yiddish in Adobe InDesign. Although using Hebrew on one’s computer is fairly simple, one thing that is not so simple is adding Hebrew nikud (vowels) to your text. In Hebrew, unlike in English, vowels are written as a series of marks, generally below the other letters. An example from my article on fonts:

Nikudot-and-Taamim-Example

In the above text, the blue marks are nikud. In general nikud are not needed for advanced readers of Hebrew, and if you were to buy a Hebrew-Language newspaper or a book in a bookstore, none of them would have nikud, except for when the meaning of the word could not be determined otherwise.

Recently, I had reason to add nikud to a document, and I decided to finally figure out how to add them. Keep in mind, I use a Mac, so these are Mac-specific instructions. For general information on nikud, and codes that can be used on Windows, see the Wikipedia article Niqqud.

On the Mac, there are two keyboard layouts you can use for Hebrew.

First, there is the standard Hebrew layout that is what is used in Israel on all computers.

Second, there is something called Hebrew QWERTY, which maps the Hebrew letters to the closest sounding letters in English, so for example Reish (ר) is mapped to the R and Nun (נ) is mapped to the N. There are some useful shortcuts, like end-letters (in Hebrew some letters change form at the end of a word) simply being Shift and the standard key. For someone who works mostly in English and only occasionally needs Hebrew, Hebrew QWERTY is much quicker to learn.

Adding nikud to text can be done with either layout, although there are some differences. In both cases most nikud are added by using a special key combination, usually using Option (Alt) and a second key. In the standard Hebrew layout, most of the nikud map to Option and a number. For example, adding a kubbutz (which looks like three diagonally arranged dots – as in אֻ) is done by typing a letter and then the key combination Option-8. Just like Hebrew QWERTY tries to map the sounds of letters, it also tries to map the sounds of the nikud, so for the example above of the kubbutz, the key combination is Option-U (the kubbutz sounds like a U).

Hebrew QWERTY can use most of the key combinations from the standard Hebrew layout as well, although not all. All the Option-Number combination (i.e. 0-9) can be used on both layouts.

In order to make it easy to learn, I’ve created a chart that lets you figure out which key combination to use for each nikud. You can download it as a PDF and print it out for easy reference. The first ten combinations are shown using the letter Aleph (א) as an example, with the nikud added. When I write Opt-Sh I mean Option-Shift together with the key shown after it. The next two use a vav (ו) as the example, and the last two are specific to the sin/shin (ש). Most of these nikud can be used on many different letters. I have only added the most common nikud, although there are some more rare ones. For those, I suggest taking a look at the Wikipedia article Niqqud.

The chart is below. You can also download a PDF version if you want.

MyHeritage announces integration with 23andMe

logo-MyHeritageIn one of the more interesting announcements in the genealogy world of late, MyHeritage has announced a partnership with genetic testing company 23andMe.

logo-ftdnaUnlike the partnership between MyHeritage and Family Tree DNA which dates back to 2008 and was extended in 2012, this new partnership is not just an affiliate sales relationship.

23andMe LogoMyHeritage has announced that they will be integrating their service directly with 23andMe, allowing one to confirm relationships in your tree on MyHeritage using the DNA data on 23andMe. Certainly a very interesting development, and it will be interesting to see how far they go with this integration.

It will also be interesting to see how the other players in this field respond to this development. MyHeritage, in addition to their namesake site also runs the large Geni.com family tree site. Will Family Tree DNA stay partnered with MyHeritage? Will they seek similar integration with MyHeritage? Will that even be allowed by 23andMe?

If not, will they seek to partner with another large family tree web site? Ancestry.com has their own family trees, but also their own DNA tests, so it would seem that’s not possible. From there, the size of family tree sites drops dramatically. TribalPages? OneGreatFamily? WikiTree? If the integration is done right, this creates a real strategic advantage for MyHeritage and 23andMe, that it would seem only Ancestry.com can really compete with at this stage.

See MyHeritage CEO Gilad Japheth speak about the new partnership on Bloomberg TV here:

and read more on MyHeritage’s blog post announcing the new partnership.