My lecture Preserving Photographs, Scanning, and Digital Backups at this weeks’ IAJGS International Conference on Jewish Genealogy was well attended with somewhere around 150-200 people. While I can’t post the video of the presentation on my blog, I do want to share some of the information from the lecture here.
The two most common questions I get about scanning photographs are:
1) What DPI do I need to scan my photo?
2) What file format should I save the file in?
DPI stands for dots-per-inch, and refers to how many pixels are present in each inch of the photograph. For example, if you had an 8×10 inch photograph, and you scanned it at 100dpi, you would have a photo that was 800×1000 pixels, or 800,000 pixels altogether. That’s less than a million pixels, or another to say it is it is less than a megapixel. Doubling the DPI to 200dpi, gives you 1600×2000 pixels, or 3,200,000 pixels, or 3.2 megapixels. Note that doubling the DPI effectively quadruples the number of pixels, since the dpi increases in both vertical and horizontal directions.
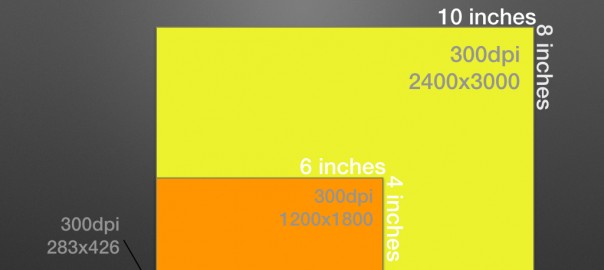
Here’s another way to look at, in a slide from my presentation:

Basically, if you look at scanning photographs (or negatives/slides) you can see that scanning it at 300dpi for different sizes will give you much different size images. I have a rule-of-thumb that I use to determine the correct DPI to scan at, and basically it has to do with figuring out the largest size you want to be able to print (printing is usually done at 300dpi) and then adjust your scanning dpi to insure you’ll have enough pixels to print. Here’s the summary:
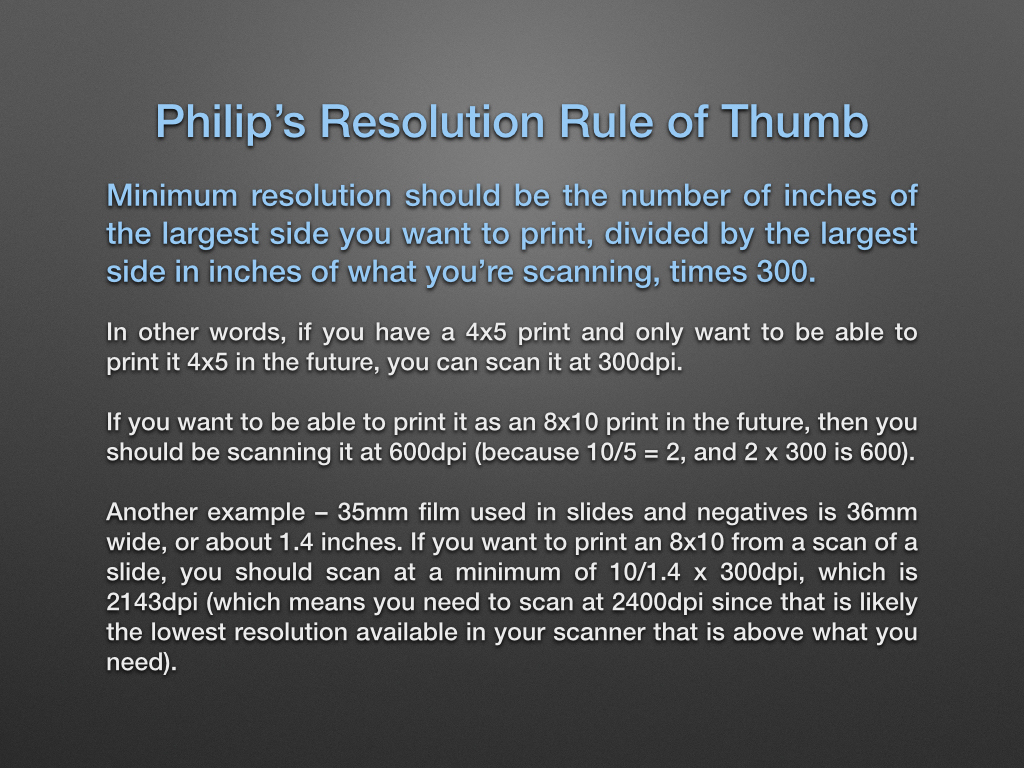
For people reading this on a small screen where the image is hard to read, the basic rule is:
Minimum resolution (DPI) should be the number of inches of the largest side you want to print, divided by the largest side in inches of what you’re scanning, multiplied by 300.
So if you are scanning a 4×5 print, and want to be able to print at 8×10, you need twice the DPI you’ll print at, so 600dpi. Of course, it doesn’t hurt to scan more than you need, although there are diminishing returns. Not all photographs are high enough quality to give you a better picture when scanned at very high resolution.
A Kodachrome slide supposedly has enough resolution to output about 20 megapixels. That means you can basically max out a 4000dpi slide scanner and get a good result. That said, a small old print with lots of grain probably wouldn’t benefit by going beyond my rule of thumb, and some likely could be safely scanned at a lower resolution.
Storage is cheap though, so I say scan as high a resolution as you want, and use my rule of thumb as the minimum guideline.
So once you’ve figured out what resolution to scan in, what format should you save it in?
The short answer is TIFF. TIFF was actually designed early on for the purpose of scanning photographs. TIFF also, for the most part, does not lose any data in the file format, unlike formats like JPEG which always compress data in a lossy fashion (I say for the most part because it’s technically possible to use JPEG compression in a TIFF file, but it’s rare, and I doubt any scanner software you would use is going to do that). You can scan to TIFF format using LZW compression that is lossless (i.e. does not degrade the photo quality). TIFF is also good because it is so widely supported, and is used by archives and libraries for their own scanning, and is unlikely to become unsupported by future software.
PNG is also a good format for scanning. It’s a more modern format, and offers built-in lossless compression. It’s not as widely supported, but if space is at a premium, it might save you a bit over TIFF.
JPEG is not a good format for scanning, because it a lossy compression format, and you will always lose some data when saving to a JPEG, even if you save it at 100% quality. I sometimes scan to both TIFF and JPEG, as JPEG can be easier to share sometimes, but I am sure to have the TIFF file as well.
PDF is not a good format to scan photographs with, as you have no control over how images are compressed, and editing them is much more difficult than TIFF or PNG. In general, PDF files will actually use JPEG compression anyways, without being able to even set the quality. If you’re scanning a multi-page printed document, you can use PDF as a convenient way of sharing it, but if there are photos and other important content in the document, I would suggest scanning it as a TIFF as well. It’s not well known, but TIFF also supports multi-page documents, just like PDF.
If you have additional questions about scanning photographs, please post them in the comments below.
Thanks! You made this very clear!
For magazines that have action pictures and articles along with, use a TIFF format to scan, then convert to PDF for digital sharing? I would like to be able to print them as well and am wondering if after converting to PDF, would that PDF be good to print from or will I need to sort through the TIFF picture files and organize them to send off to the printer?
thanks,
Eric
Should you scan in color or B&W?
Depends on whether the photo is B&W or color. I would always suggest trying to capture as much of the photo as possible, but not more. So for a B&W photo there is no advantage of scanning in color. You’ll only be tripling the size of the photo.
I have many small Black and white prints from early 1900s. My grandfather did his own prints at various sizes. Is it better to scan each separately or arrange on the scanner bed as one scan? My thinking is that using software like photoshop my family members can crop and enlarge the ones they want but still enjoy all the nuances in each photo. When picking one from the duplicates I am thinking that the smallest ones would have best resolution to include to enlarge from?? Thank you for your insight.
Thank you. This is the best explanation I’ve found on resolution and format for scanning photos.
THANK YOU! for sharing this… this couldn’t have come at a better time for me. I’m no spring chicken and definitely not tech minded. I’m in the process of trying to create digital images of some very old prints, some are tiny. Sadly I don’t have that many, maybe 20-30, so they are all the more precious and I’d like to share with family who are now spread around the world. To begin with I thought I’d have to get someone professional to scan the hard images. I’ve since realised how easy it is to ‘scan’ to a digital image, which is great. I was, however, somewhat bamboozled by the different options I then had available. Your piece has simply and clearly given me exactly the information I need to take my project to the next stage. Very grateful!
Glad it was helpful Linda.
Hi Philip, Thank you for the information on determining DPI. I was also interested to learn that scanning photos in TIF format is better than JPG. My main objective is to digitize stacks of color photos. What is the best scanner that can handle a stack of photographs, with software to edit digitized pictures? Wi-Fi would also be nice but I have to keep the overall cost down. Thanks for your time!
Happy trails, Bob
I have been trying to scan old (early 20th century) photographs using a HP8630 printer/scanner in the TIF format (available in black only). The scanned images almost always come out entirely black and virtually unintelligible. What am I doing wrong?
You are probably scanning in 1-bit mode, meant for text documents, instead of 8-bit mode meant for B&W photos. 1-bit means there are only 2 possibilities for each dot – black or white(1 bit that is set to either 0 or 1). 8-bit means there are 256 possible shades between black and white (2 to the 8th power). You can also use 16-bit for B&W photos, although in most cases this isn’t necessary.