Many Jewish researchers will find that some members of their family originated in what is now, or once was, Poland. This post is targeted at Jewish researchers, but anyone who has roots in Poland may find (at least parts of) this information useful.
Poland’s Borders
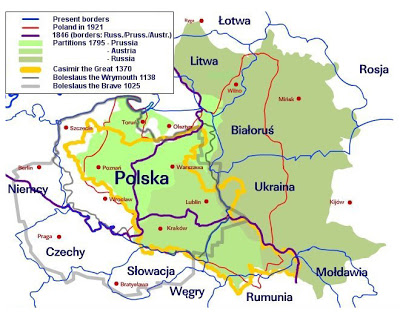
Poland’s borders have changed a lot over the years, and what was once Poland might now be in Lithuania, Ukraine or Belarus. In addition, what was once part of Russia, Prussia (part of what became Germany) and Austria may now be in Poland. It’s possible that someone lives in many countries without actually ever moving. The following map illustrates the complexity of figuring out what country a relative of your might have lived in:
I have many examples in my own family where relatives had said they were from Russia, when the town they came from is currently in Poland. This is a particularly important point when you find records on your family in the US, such as a passenger manifest from their arrival to the US, or naturalization papers, when they say they were born in Russia. Don’t assume that means the current country is in Russia, unless you know the city and can confirm that on a map.
I’m not going to go into how to find where your family comes from in this post (that will in future posts), but rather once you know where and when your relative was born (and that place is or was in Poland) how to find vital records connected to that relative.
Starting with JRI-Poland
So let’s begin. You know the name of your relative, and where he was born and when he was born. If you don’t know the exact date, that’s okay, we’ll deal with that a little later in the post. The first place to start your search is JRI-Poland. JRI-Poland is a database of indexes to Jewish records in what is now or once was Poland. The indexes come from a number of sources, but there are two primary sources: JRI-Poland’s own JRI-Poland/Polish State Archives Project and LDS Microfilms.
Basically, the LDS church microfilmed over 2 million Jewish records, including from some towns whose records were destroyed in WWII. Even with so many records, however, the LDS films do not cover the majority of records in Poland. Those records and their indexes are preserved on microfilm and accessible in the Family History Library, or from the many Family History Centers around the globe. Of course, the records may be in Polish, Russian or German depending when and where they were created, so it is not so easy to access those records without knowledge of the relevant language.
Initially JRI-Poland worked to index records not in the LDS microfilms, since so many were not even available on those films. They created a joint project with the Polish State Archives where they photocopied the index pages for each archive and then hired local workers in Poland to transcribe each record from whatever language they were in to English (or rather, to latin script). JRI-Poland carried this out by arranging for people to figure out all the towns with records of Jewish people in a particular archive, then raising money from researchers interested in each town. Thus researchers would contribute money to the indexing efforts of the town from where their own family came. As JRI-Poland indexed millions of records this way, they eventually turned back to the LDS microfilms and worked to create computerized indexes in English to those records as well. JRI-Poland has indexed more than four million records so far, from over 500 towns.
To use JRI-Poland, you go to their main page and select Search Database. This takes you to their search page which has a lot of options. I’m not going to go into all the options for searching JRI-Poland in this post, but you should check out some of the neat features like searching in a radius around a specific latitude and longitude, which is helpful if you can’t find records of your relatives in the town you think they came from, and want to check surrounding towns. The core of the search interface is really this:

You can choose which parameters you want to search, but usually this will be Surname and Town. You can, if your surname is rare, try searching with just the Surname to try to figure out the town, but as I mentioned for the purposes of this post I’m assuming you know that already.
In the above example I’ve used the surname Eisenman and the town Tyszowce. Note that for the Surname I’ve used ‘Sounds Like’ as the setting and for Town I’ve used ‘is Exactly’. The reason for using ‘Sounds Like’ for the surname is that it is very common for there to be multiple spellings for names, even for the same family in the same town. Records from one town were not necessarily all transcribed by the same person, so even the same name in Polish might show up spelled differently depending who was transcribing it. The reason for using ‘is Exactly’ for the town name is that each town has an exact spelling, which corresponds to the currently used spelling for the town. As you do your research into towns, you should always use the current spelling of the town, and in this case you should figure it out before searching so you don’t get listings from many similarly sounding towns which are irrelevant to your search.
Different Kinds of Results
If you were to carry out the above search, you would find two sets of results. This means that the indexes came from two different sources. In some cases you might find many sets of results, since some indexes show the town of birth of people who show up in other towns. For example, if your relative was born in town A and married in town B, and you searched for town A you might also find his marriage record in town B (if they indexed the birth town) which would show up a separate result set. The two result sets from the above search start out as follows:


As you can see in the captions, one set is from a microfilmed index, and one is from index pages copied from the actual archive in Poland. How do I know this?
Take a look at the first image – the last column is called ‘Film’ and the number listed is the LDS microfilm number. If you were to search the LDS library on FamilySearch.org, you would find that there are actually seven microfilms that cost the vital records of Tyszowce from 1826-1890. The first record is from microfilm 766305 and the result shown in the snapshot above are from 766306. Also note that the first two records are children of the same parents, but their last names are spelled differently (and both different than the way I spelled it in the search). This is why you need to use the ‘Sounds Like’ setting for names on the search.
In the second image, you’ll notice there is no ‘Film’ column. In addition if you look closely in the result set description at the top, there is an extra line compared to the first set, where it says ‘records in Fond 785 in Zamosc Archive’. Note that these records are in the archive of Zamosc, a nearby town, and not in Tyszowce itself.
Ordering Records from Microfilm
So you now have two types of records, ones on microfilm and ones only available directly from the archive. Let’s see how you can get these records. Let’s start with the microfilmed record. Let’s say you want the first record listed. You need to extract the following information on the record:
Surname: Eyzenman
Given Name: Mejlech
Town: Tyszowce
Year: 1840
Type: B (Birth)
Akt: 36
Film: 766305
With the above information anyone with access to LDS microfilms should be able to find the specific record you want. The Family History Library and its associated Centers will not send you copies of records from their microfilm, someone has to actually access the microfilms and copy them. There are a number of ways to get copies, some easier than others, some more or less expensive.
First, you can go to the Family History Library in Salt Lake City, or one of the Family History Centers and try to get the record yourself. Keep in mind that if you’re going to one of the regional Centers, you will probably need to order the microfilm in advance, and then return to use the microfilm. If you are interested in copying a large number of records this might make sense, although remember that the records are in Polish, Russian or German and if you’re not familiar with the necessary languages it might be difficult to find the records even if you know where to look. If the number of records you want are small, it will almost never be worth going to the do the record retrieval yourself.
Next, you can have someone else go to the Family History Library for you. For other types of records, particularly those in the US, you can sometimes find volunteers to look up records for you. Examples of places to find such volunteers include Random Acts of Genealogical Kindness and photo volunteers on Find A Grave. In this case, however, I think you will need to find either a friend or a professional researcher to help you. There are many professional researchers who live in or around Salt Lake City and who will go to the Family History Library for you and retrieve records for you. Keep in mind that not all researchers will be familiar with records from Poland, so you’re better off finding someone who has experience working with Jewish records from Poland. One researcher you can try is Banai Feldstein, from Feldstein Genealogical Services in Salt Lake City. She can retrieve records and e-mail you scans of the copies, and you can pay her via PayPal which is a nice plus. For other researchers that specialize in Jewish records, check out the Researchers Directory on the Jewish Genealogy News web site.
Lastly, there is another option, but only in some cases. Beit Hatfutsot (formerly the Diaspora Museum, and now called the Museum of the Jewish People) in Tel Aviv has a collection of LDS microfilms that cover a good portion, but not all, of the Jewish records in LDS microfilms. You can see the full list of the films they have by browsing the database here. If they have the microfilm, they can make a copy of a record and mail it to you. Their rates are very reasonable, only 5nis in Israel and $2 in the US for copied records, including VAT in Israel and mailing with a per-order charge of 10nis (I guess $4 in the US?). While cheaper than using a professional researcher, you need to wait several weeks and you need to receive the records in the mail, since they do not scan and e-mail records. If you were to browse the database for Tyszowce (the town in my example above) you would see they have five films from Tyszowce, not the full seven listed above. That means that if you find records from one of films not listed in the museum’s collection, then you will need to go with one of the above methods. In the first record listed above, which I transcribed the details to, the film number is listed as 766305. If you look at the list on the museum’s website they do indeed have that film.
So how do you order from the museum? You go to their order page, where you will fill out your contact information, microfilm record list and payment information. Let’s look at the microfilm record section of the order page:

Note the list of items I extracted from the record above, and you’ll see they match this form exactly. When you enter the microfilm number in the first field it will very smartly verify that they have that film in their collection – it thus will not let you order a record they do not have. That’s why in the snapshot above the word Microfilm is in red, because it will not let you order a record for a film that does not exist in their collection, and since I didn’t enter a number above, the field doesn’t match anything in their collection. If I had entered the number, the Microfilm field title would switch from red to black to show it was found. If you filled in the form with the record above, it would look like:

If you want to order more than one record, then you just click on the ‘Add Another Microfilm’ button at the bottom and another set of fields will pop up for you to fill in.
So once you fill in your contact info, add the records you want, and add your payment, you just click the Send button at the bottom of the page and then wait a few weeks for the records to arrive.
Ordering Records from Archives
You might remember that there was a second search result, of records in the Zamosc archives. Let’s extract the data from the first result:
Surname: Ajzenman
Given Name: Ezra
Town: Tyszowce
Year: 1893
Type: D (Death)
Fond: 785
Akt: 33
You’ll notice I’ve added in the Fond number from the collection title. The Fond is the collection of records that this record is contained in, and the Akt number is location of the actual record within the Fond.
The first thing you need to do to get this record is to find the Zamosc Archive, where it is listed as being located. JRI-Poland keeps a list of archives that you can refer to to find the archive. Oddly they only list the mailing address and e-mail address, and not the web site for each archive, but the e-mail address should be enough. You can try searching online for the full name of the archive (in this case ‘Archiwum Państwowe w Zamościu’ and seeing if they have a web site (which in most cases they will). In this case the web site shows up as http://www.archiwum.zam.pl/ and if you go to the site you’ll find they have a little British flag in the corner that takes you to an English version of their site. The fact that there is an English web site is a good sign, as many archives do not bother. The web site will tell you more about the records available, and might tell you the pricing for ordering records. In this case the site is not very complete, so it isn’t that useful, but if you browse through the Polish version of the site, you’ll find at least one useful piece of information: the archive’s bank details. Most archives will require you to transfer money directly into their bank accounts in order to fulfill your order. This is annoying to be sure, but there’s not much you can do about it. In my own case, I’ve sometimes had to pay a larger bank transfer fee than the fees the archive was charging me – certainly something which is frustrating.
So you want to contact the archive. You have their e-mail address. What do you write? Well, first you need to decide if you want to try English, or jump ahead to Polish. Many archives do not have English speakers, so you might not really have a choice. If you send an e-mail in English and get no response, you should try Polish.
Sending a Letter in Polish
How do you send an e-mail in Polish? I suggest trying Google Translate. It’s not perfect, but you can check its accuracy in a fairly simple way. I start by writing in English and having it translate to Polish. Then I copy the Polish text and switch the translation direction (click on the little two-way arrow button between the language names) and paste in the Polish text. If the text comes back with more-or-less the same meaning as what I originally wrote, I assume the translation will be understandable to the person receiving the letter. You can always include both the English and the Polish text in your letter if you want.
Let’s start with a simple framework:
Dear Sir,
I am interested in getting scanned copies of the following records:
Please inform me how much it will cost to order these records and how I can pay for them.
Thank you,
That gets translated to:
Jestem zainteresowany w uzyskaniu zeskanowane kopie następujących zapisów:
Proszę o poinformowanie mnie, ile będzie kosztowało aby te dane i jak mogę zapłacić.
Dziękuję,
If you reverse the translation direction and copy the Polish text back into the translation field, it gives you following text in English:
Dear Sir,
I am interested in obtaining a scanned copy of the following entries:
Please inform me how much will it cost to these data, and how I pay.
Thank you,
Not bad. Probably the text is close enough.
[Tom in the comments below (March 2013) supplied a corrected Polish translation for the above text as:
Szanowny Panie,
Jestem zainteresowany uzyskaniem skanów następujących aktów metrykalnych:
Proszę poinformować mnie, ile będzie kosztować skanowanie tych dokumentów i jak mogę zapłacić.
Dziękuję,
So if you’re going to use the text, you should probably use his.]
Now you need to fill in the information on your record, translating the field names like Surname, Given name, etc.
Using Google Translate, I get the following translations for the field names:
| Surname: Ajzenman Given Name: Ezra Town: Tyszowce Year: 1893 Type: D (Death) Fond: 785 Akt: 33 |
Nazwisko: Ajzenman Imię: Ezra Miasto: Tyszowce Rok: 1893 Typ: D (Death) Fond: 785 Akt: 33 |
Now, considering this is so important to get right I would check this (and of course you can just copy this from this posting, but I’ll explain what I do to check for accuracy. FamilySearch has a number of language resources available on their site, including one for Poland called Poland Genealogical Word List. If you check that word list, you’ll find that indeed the translation is pretty good. The only mistake, but one that would probably be understood, was to translate ‘Town’ into what the wordlist says is actually ‘City’. I doubt the archive would fail to understand what you meant. According to the wordlist, however, the correct term would be Gmina. Also, you may have noticed that it did not translate the word ‘Death’ for some reason. There are several words listed for death in the FamilySearch site, but let’s go with zejść. So your full letter would look like:
Jestem zainteresowany w uzyskaniu zeskanowane kopie następujących zapisów:
Nazwisko: Ajzenman
Imię: Ezra
Gmina: Tyszowce
Rok: 1893
Typ: D (zejść)
Fond: 785
Akt: 33
Proszę o poinformowanie mnie, ile będzie kosztowało aby te dane i jak mogę zapłacić.
Dziękuję,
Of course, sign the letter at the bottom as well. Now send this letter in an e-mail to the archive’s e-mail address and wait for a response. In response to a similar e-mail which I actually sent in English, I got the following response the next day in Polish:
Opłata za poszukiwania wynosi 25 zł. Opłata nie jest zwracana w przypadku kwerendy negatywnej.
W przypadku odnalezienia aktów powiadomimy o ich liczbie i dodatkowej opłacie 5 zł od skanu.
konto
Archiwum Państwowe w Zamościu
Narodowy Bank Polski Oddział Okręgowy w Lublinie
47 101013390016612231000000
PL 47 101013390016612231000000 (BIC: NBP LP LPW)
Search fee is 25 zł. The fee is not refunded in the event of a query in the negative.
If you find an update on the acts of their number and to an additional charge of 5 zł scan.
Account
State Archives in Zamosc
Polish National Bank Branch in Lublin District
47 101013390016612231000000
PL 47 101013390016612231000000 (BIC: NBP LP LPW)
It’s not perfect, but it’s understandable. The cost of searching is 25zl and scans are 5zl each. It then lists the archive’s bank details (which are the same as the page we found earlier). Now you can send 25zl and then 5zl later, but frankly the cost of sending money internationally is expensive, so I would suggest just sending it all at once. 30 zloty is about $11 (US).
Sending Money to Banks in Poland
How do you send money to the bank in Poland? It’s not so easy. It would be nice if the archives would start using PayPal or something similar, but I haven’t found one yet that does, so you need to figure out how to get money into their accounts.
You can always give the bank account information to someone in your bank and ask them to transfer the money. Many banks actually let you set up an international money transfer online. I’ve done this from the web interface to my account at Bank of America. It’s pretty easy, but it’s not cheap at $35 per transfer. That’s a lot more than the 30zl fee you’re sending the archives.
Another option is an online money transfer company. I’m not going to recommend any of them since far be it from me to recommend someone who will be handling your money, but one such company I found is Xoom.com. They let you send money to accounts overseas for only $5 per transfer ($10 if you want to pay with a credit card instead of withdrawing the money from your bank account) but you need to send a minimum of $25. Thus if you were ordering that one record you’d be sending $25, which right now is about 70 zloty. That means you’re sending an extra 40 zloty. One way to look at this is that you could spend $46 to send $11 to Poland ($35 bank fee plus $11 to the archive), or $30 to send $25 to Poland ($5 Xoom fee and $25 to the archive). Of course the Xoom option sends more than twice as much money for less overall cost to you. In this case, since you’re sending more money I would just ask for more records. Look up what other records the archive has, and ask them to look for other records connected to your family. It’s not a perfect situation, but usually you’ll probably be order more records and it won’t matter as much.
One useful tool I can recommend using before entering the bank information into whatever service you end up using, is xe.com’s IBAN Decoder. If you look at the bank information given by the archive above, there is a long string of numbers that follow the two-letter code for Poland. There is actually a special way to format that number which you will likely need when entering the bank account information. If you enter the string:
PL 47 101013390016612231000000
ISO Country Code PL(Poland)
IBAN Check Digits 47
Bank Code 10101339
Account Number 0016612231000000
Transit Number 10101339
Finding Other Records in Poland
How do you know what archives are actually available for the town you’re researching? JRI-Poland has not indexed every record, and doesn’t have many records that are not vital records. Many other records exist, such as census records, voter lists, notary records, etc.
There are basically two ways to find out what records exist for a given town. First there is Miriam Weiner’s Routes to Roots Foundation. If you click on ‘Archive Database’ on the left menu and then ‘Archive Documents’ under Search on the right, you’re brought to the search page. If, to continue our example, you search for Tyszowce, you’d find there are 14 record groups. These are spread among archives in Tyszowce, Zamosc and Lublin, as well as one record set at the Jewish Historical Institute in Warsaw. Record types include Birth, Marriage, Death, Voter Lists, Kahal/Jewish, Tax Lists and Notary Records. Sometimes a single record type (such as Birth) are spread among many different archives. In this instance, birth records for 1826-1875 are in Lublin, for 1876-1897 are in Zamosc, and for the years 1898-1915; 1920-1923; 1925-1926; 1928-1938 are in Tyszowce itself.
Let’s say you want to search for Notary Records. Those records are in the Zamosc archives, so you draft a letter similar to the above letter and send it to them, asking how much it costs to search for records. As there is no index, you have no idea how many copies you might receive, so perhaps ask the archive if you can wait to pay until after the search is complete. If not, perhaps send some extra money to cover a few copies and ask them to charge you if the copies exceed what you send only. In the above example, you could ask the archive to search the notary records to use up the extra money you sent.
The second resource you can use to find other records for your town is the Polish State Archives’ PRADZIAD database. The search interface is in English (if you click on the British flag) but the results will be in Polish. Google Translate is useful here – you can use the built-in translation feature of the Google Chrome browser, or the ability to translate pages on the fly in Firefox or IE using the Google Toolbar. Thus you can translate the results. You can choose the types of records in the search, but I suggest just doing a full search on the town. If you were to search Tyszowce in this interface, you would find 22 record groups. Many of these overlap with the Routes to Roots list, but some of these are religion-specific and not Jewish, so probably the Routes to Roots list is more comprehensive. While the PRADZIAD list is primarily, birth, marriage and death records, the Routes to Roots list also had voter lists, notary records, etc. However, if you look closely you’ll notice that there are some relevant records listed in the PRADZIAD list that are not in the Routes to Roots list, specifically Birth records from 1810-1825, which are not listed in Routes to Roots.
Basically, when looking for records not indexed in JRI-Poland, make sure to search both Routes to Roots and PRADZIAD.
Conclusion
So in conclusion, there are three main categories of records – records in state archives indexed by JRI-Poland, records on LDS microfilm indexed by JRI-Poland, and records in archives not indexed by JRI-Poland (which you can find and then contact the archives to find the specific records). There is a fourth category I haven’t discussed, which is LDS microfilms not indexed by JRI-Poland. Hopefully this category will disappear over time. In most cases those records are also in the archives, so you’ll still find them by searching the archives.
I hope this summary was useful. If you find any mistakes, please let me know in the comments. If you have recommendation for other ways to get records, please also post to the comments. Also feel free to recommend professional researchers you’ve used that can help others with the process.
