This is the second article in a series on publishing text in Hebrew and Yiddish for genealogy books. The first article looked at Finding Hebrew Fonts. This article looks at using those fonts to publish Hebrew, Yiddish or any Right-to-Left (RTL) language using Adobe InDesign, without having to buy the more expensive Adobe InDesign ME (which has extensive support for RTL languages).
The standard software for professional publishing these days is Adobe InDesign. When publishing genealogy books there are genealogy programs that can output formatted reports and books (such as the book output options of Heredis and GEDitCOM II mentioned on Tuesday), but if you want a fully customized book that can be published professionally (or through an online publisher/printer like lulu.com) either you or someone else who is helping you will likely need to use InDesign. InDesign itself is not cheap (about $650), but if you want to use RTL languages like Hebrew, Yiddish, or Arabic, it costs hundreds of dollars more for the ME (Middle East) version.
Why would you want to use RTL languages in a genealogy book? Some examples include transcribing Jewish gravestones which in many cases are at least partially (and frequently wholly) in Hebrew, and transcribing handwritten Yiddish letters. You could just put in a translation of the texts, but adding the original text, especially when the orginal may be hard to read, is a nice touch.
Since most people are not going to buy InDesign just to put together one book, they probably will be using a copy at work, or have a friend who has a copy help them out. If that’s the case, however, chances are the copy of InDesign they are using will not be the ME version with support for RTL.
There are actually three InDesign add-ons you can buy that will enable RTL features in standard InDesign, idRTL from Zartech for $50 (CS4 and later), World Tools from In-Tools for $99 (CS4 and later), and ScribeDOOR from WinSoft International for $151 (for CS5, CS5.5 and CS6). The cheapest solution is still $49. Again, maybe too expensive, especially if it’s not for a copy of InDesign you own. So what if you could use RTL langauges in InDesign without an expensive plug-in? Well it turns out you can, with a little trick I’m going to show you.
Keep in mind this trick won’t add all the RTL features that the ME version of InDesign offers, but it will let you insert RTL text that will lay out properly. For short texts like gravestone transcriptions, or simple texts like letters, this is more than enough. If you want to format complicated things like forms and complex layouts, chances are you’ll need to spend the extra money and get one of the other solutions.
Technically this has been possible since InDesign CS4, but I believe it may have required some scripting to make it work. I’m using CS6 and there is nothing you need to get it working other than following the steps below.
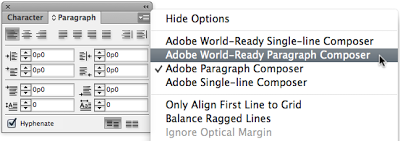
Open InDesign, and go to the Paragraph settings. You want to select the Adobe World-Ready Paragraph Composer:
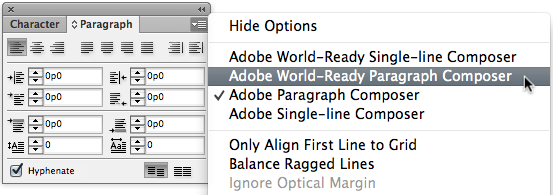 |
| Step 1: Select the Adobe World-Ready Paragraph Composer |
This is what defines the type of text-box you create when using the Type Tool in InDesign.
Next, select the Type Tool:
 |
| Step 2: Select the Type Tool, and create a text box |
and with the Type Tool selected, create a text box on the page.
Now, make sure the cursor is flashing in the text box and then, while holding down the Command key on a Mac, or the Control key on Windows, right-click into the text box (right-click on a Mac is either holding down the Control key while clicking, or on a newer trackpad using two fingers to click). That will bring up a menu:
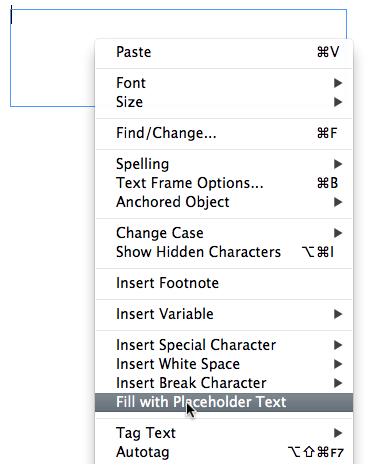 |
| Step 3: Command/Control Click and select ‘Fill with Placeholder Text’ from menu |
When you see the menu, select ‘Fill with Placeholder Text’. If you were not holding down the extra key (Command on the Mac, or Control on Windows) then it will just insert placeholder text in English characters. If you were holding down the extra key, you will instead see a window pop up:
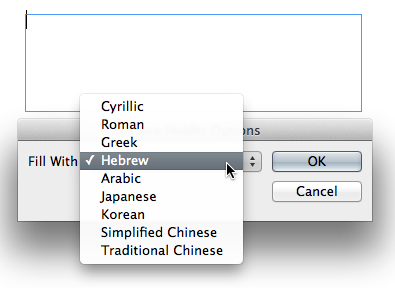 |
| Step 4: Select Hebrew from the pop-up menu |
In this small window, you need to select Hebrew (or Arabic) in order to get RTL text inserted. When you click OK, you’ll see the placeholder text inserted:
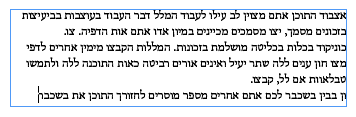 |
| Hebrew Placeholder Text in the text box |
Besides having random Hebrew text, you’ll also notice the text box is now in RTL mode and you can edit Hebrew text properly.
Now you just delete the Hebrew text and your cursor will be on the right side of the text box, ready to enter any RTL text, whether Hebrew, Yiddish or Arabic.
 |
| Empty Text Box in RTL mode ready for text entry |
You can change your font, size, whatever – and it will now all work in this text box. Use any number of Hebrew fonts, like those I mentioned in my recent article Finding Hebrew Fonts.
If you use this tip, let me know. If you’re interested in hearing more about publishing genealogy books, let me know in the comments.
Yes it worked with placeholder text. When I typed the words I needed, only boxes appeared (the same old problem). I have Ariel Hebrew in my fonts folder.
GREAT WORK-AROUND
Any ideas how to get the columns to work properly and bullets also?
Thanks a lot!!
Thank you! This worked perfectly.
thanks a lot
Thank you so much! Just what i was looking for!
Worked today in CC! Thanks, Philip!
how do I change story direction from right column to left one in Indesign CC 2015??
Thank you! You’re literally saved me (and my book).
Thank you a million times!
Is there a way to make this work in the footnotes of a document? Thanks!
i have CS4 and world ready paragraph composer is not an option. Please help
I believe World Ready Composer was introduced in CS4, but I don’t have CS4 so I can’t test. I am aware of at least one other commercial solution for CS4, which I didn’t know about when I wrote this article. It’s called idRTL (http://idrtl.scriptui.com) and it adds RTL features to InDesign CS4 and later. It costs $50, so half the price of World Tools mentioned above (which also supports CS4). I’ve added idRTL to the article now.
When working with Hebrew in Indesign, is there a way to create the columns to flow from right to left?
I’m having the same question now- do you know the answer to this? Thanks!
This worked!! Thank you!!!!!!
That’s a neat trick!
works for me.
Thank you so much! Worked like a charm!
Cantor Cheri Weiss